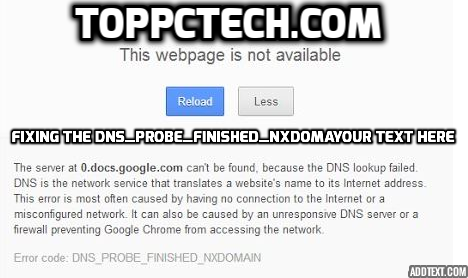
DNS_probe_finished_nxdomain error is one of the most common browser errors which is daily affecting most PC user. It regularly affects the browsing system which prevents us from getting to some of the sites such as Facebook, eBay, Yahoo, and other sites.

A significant number of PC users don’t have the knowledge to fix the error once it occurs in their browser. This article will help you to understand the reason it appears, how to fix, and also how to prevent the error.
Why The NxDomain Error Occurs
There many reasons associated with the error but the most common ones include the following-
- Changes in chrome setting
- Use of incompatible vpn software
- Problem with network connection
- The error can be caused by the antivirus in your PC windows
- The error can also be out of using proxy
The above are the most commonly reported reasons which cause the error to occur. Ones your browser is affected by this error you will not be able to access most sites. Let us now discuss on how to fix the error once it appears on your browser.
8 Ways To Fix Dns_Probe_Finished_NxDomain Error In Browser
1. Working on your antivirus
Some of the times antivirus refuses to work, or there are changes in their configuration which might lead to occurring of the error. To avoid this, you can regularly be checking your antivirus system.
If antivirus causes the error, the best thing is to change your antivirus system. If changing will not work you can disable the antivirus from your PC’s windows. Sometimes none of the above work, in such cases, you need to remove or uninstall the whole antivirus system completely. No need to worry about protection ones you uninstall antivirus because the system still has the basic protection from the windows defender.
If the error gets solved by uninstalling your antivirus, we recommend you to choose another antivirus system which will be compatible with your PC’s windows.
2. Using command prompt
Using command prompt is one of the easiest and commonly used methods to solve the error. To use this solution you need to perform the following steps.
- Press windows key + x to open the power user menu then click on command prompt.
- Once the command prompt open enter ipconfig/flushdns then press Enter.
- After the process is done you can close command prompt and check if the error is solved.
In case the error is not solved you can repeat the process using the following lines on step two.
Ipconfig/release
Ipconfig/all
Ipconfig/renew
netsh int ip set dns
netsh winsock reset
3. Use Google public DNS
The error can also be caused by server’s DNS if it is having some issues. You can use different server to fix this error, you only need to follow the following steps.
- Click on the network icon on the taskbar and chose your network from the list.
- Click on change adapter option.
- Right Click on your network connection and choose properties from the menu.
- Choose internet protocol version 4 (TCP/IPv4) then clicks on properties button.
- Go to use the following DNS server address. On the preferred DNS user enter 8.8.8.8 and on the Alternate DNS user enter 8.8.4.4 then press OK button.
After step five the error should be solved. If the above steps don’t work on your server, you can also try resetting chrome to default by doing the following step.
- Open a new tap on the Google Chrome and enter chrome://flags/.
- Click on reset all to default button.
- Your Pc’s chrome will be reset, and hopefully, the error will be fixed.
4. Restart the DNS client service
If the DNS error appears in the Google Chrome, it is possible for you to fix it by restarting DNS client service. You will need these steps this solution.
- Press windows key + R and enter services.MSC then click OK
- On the menu which will appear to locate DNS client service, right click on it and choose Restart.
- After step two you can close the service windows and check if the error is resolved.
5. Disable VPN software
Many PC users use VPN software to protect their online privacy; the software helps but sometimes they interfere with the DNS which will cause the error to occur. To resolve the problem, you can just disable the VPN client software and then check if the error is fixed.
If disabling will not fix the error we recommend you to remove the VPN client software or you can use a software uninstaller and uninstall the VPN system. Note: if you use the uninstaller application it will remove the software together with the files and registries associated with the software. If you remove the software and the issue is solved, then you might need to consider using different VPN client.
6. Disable proxy
Peoples also use proxy to protect their privacy online, but it can also cause DNS error. To fix the error, you can turn off the proxy by following these instructions.
- Press window key + I to open the setting app.
- Get to Network and Internet section
- Select proxy on the left menu and turn off all options from the right pane; this will disable your proxy, and the error will be fixed.
7. Update your browser
The outdated browser version is also capable of causing the error, therefore, we highly recommend you to update your browser to the latest version. Follow these steps to upgrade Google Chrome to the latest version.
- Open Chrome and click the menu icon.
- Choose help then about Google Chrome from the menu.
- You will see the information about your PC’s version and if there are updates needed it will be automatically updated. The error should be solved after updating.
Some of the tips to avoid the error to happen in the future include:
- Updating your browser regularly.
- Make sure that the VPN client software you are using is compatible with your PC’s windows.
- Use the best antivirus software which is suitable for your PC.
- Check your extensions regularly.
8. Others Solutions
=>> Solution 1: Clear Browser History and Cache or Reinstall your Browser-
Sometime this unexpected error occurred by browser history and cache, so first you can apply this easy solution.
- Clearing all Cache and History in your Google Chrome Browser – You can simply clear all the cache in your Google chrome browser by some easy steps, 1st you click on the ‘Customize and control’ button from the top right corner of your Google Chrome browser and then you click on the Settings from the menu. Now Scroll down and you click on ‘Show Advanced Settings’ key. Now this moment you go the ‘privacy’ sector and click on the ‘Clear Browsing Data’ button. Now you see the new window popup in your monitor then you check the box that says, Cookies and Other site and Plugin Data and you also check Cached Images and Files after that you simply click on the ‘Clear browsing data’ button for clear your browser all the History and Cache.
Customize and control (top right corner) -> click Settings -> Now click Show Advanced Settings -> then go privacy segment -> click Clear Browsing Data -> check all the box -> Now you click on Clear browsing data.

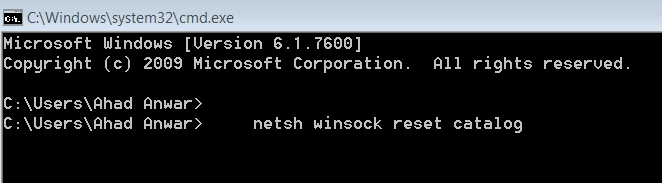
=>> Solution 2: Flushing the DNS Address-
As This DNS error occurs because of DNS lookup failed, We will first attempt to Flush the DNS address that could be a way out to this problem, Follow these simple methods:
At first you press your Windows Key + R from the keyboard to open up the Run dialogue box. Then you type in CMD and press the enter button from your keyboard to open up ‘Command Prompt’ (You can also open Command Prompt easily by press Windows key + X and simply click on the Command Prompt Admin). When you see the command prompt open in your monitor than you type the bellow highlighted command in the command prompt and press enter.
netsh winsock reset catalog
When you see the above command is executed then you reboot your computer.
Windows Key + R (Run) -> Type CMD (Press Enter) -> Type ‘netsh winsock reset catalog’ (Press Enter) -> Reboot your computer
Really this dns stuff help you to fix the dns problems. If this method doesn’t work for you then you move to the solution number three.
=>> Solution 3: Changing your DNS settings-
If you are still facing the same error in your browser then you will need to do some changing in the DNS Settings which i will explain you step by step in just a bit. First let me notify you that this necessitates you to make some modifies in your DNS Address but these modifies appears to work and helps you to get rid of the dns probe finished nxdomain error.
First you right click on the ‘Network Icon’ in your right bellow task bar, then you click on the ‘Open Network and Sharing Center’. When you click then a Window will open up in your monitor, On the left Pane site, you click on the Change Adapter Settings button.
This time you will see all your Network Connection in the screen but you will have to identify which is the active and connected network that you use, The network can be LAN or Wireless Connection. Now this time you will right click on the Active Connection icon and then click on the Properties.
When you click then a window will Pop up there just you click on the Internet Protocol Version 4 (TCP/IPv4) which is bellow in the box and then you click on the Properties button under it.
Now this time you will have to make sure ‘Use the Following DNS server Addresses’. Where you will change the following Values which shown in the Below Picture.
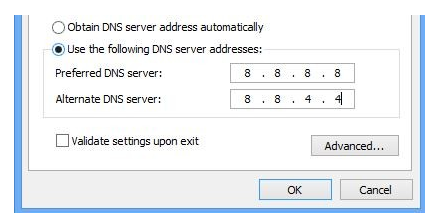
Modify the value “Preferred DNS Server”: 8.8.8.8
This also modify “Alternate DNS Server”: 8.8.4.4
Now you click the OK button and refresh your webpage.
Note: You can unchecked the Internet Protocol Version 6 (TCP/IPv6) in the bellow.
=>> Some Tips to Avoid the-
- Always try to clear your browser history, cookies and cache.
- You also clear your recycle bin, temp file, prefetch and %temp% file always.
- Always use one active internet network connection and disable others internet connection.
- If you use any type of website filtering software then obviously update the software or uninstall it.
- If you will not face the error again then you should be disable your windows and antivirus firewall.
The Final Words (Conclusion)
The DNS_probe_finished_nxdomain error can cause head ace to you but if you decide to follow our solutions above and follow instructions correctly be sure you will solve this error comfortably. Your PC will not be facing this error any more time if you use prevention points above.


